Dwarf: A PICKit 2 GUI for Linux
Last updated: 09 Sep 2009 - 12:34
Too lazy to type out the commands every time I wanted to do something to my project and with a couple of days spare before parts arrived, I decided that what I really needed was a little GUI to run the commands for me. I've used gpasm as my assembler (from GNU PIC Utilities) and the PK2CMD program hosted on the Microchip Website as the back end for this application.
Essentially this is a very simple Python powered GTK interface that executes a number of the most common command line instructions used in PIC development when you click one of the buttons. It provides some feedback to the user about how the command went.
Checkout the documentation at the end of this page, and try out the application [see https://github.com/hairymnstr/dwarf for the latest version].
Z80 Homebrew Progress
Last updated: 02 Sep 2009 - 22:26
I've made some progress on the Mark 2 project and started the Mark 3!! First the Mark 2, I've built the system that I detailed in the articles on the Mark 2. There are a few odd bugs that I spotted as I tidied the circuit diagrams to add to the articles, these will need minor re-wiring of a bit of the glue logic. I kept the system on two bits of strip-board with the CPU and the PIC on the top layer with a bit of glue logic, the rest of the system (I/O decode, memory and peripherals are all on a lower layer, interfaced with 4 ten-way pin headers and receptacles. (Pics will follow soon). The pin-outs of the connectors can be seen in the circuit diagrams.
I've done electrical testing on the system so far. All of the power pins have the right voltages on them, including the +/-10V outputs on the MAX232 chip. The clock output on the 74HC4060 chip that provides the clock for the UART is stable and at the correct frequency. The PIC also registers with the correct part number when c
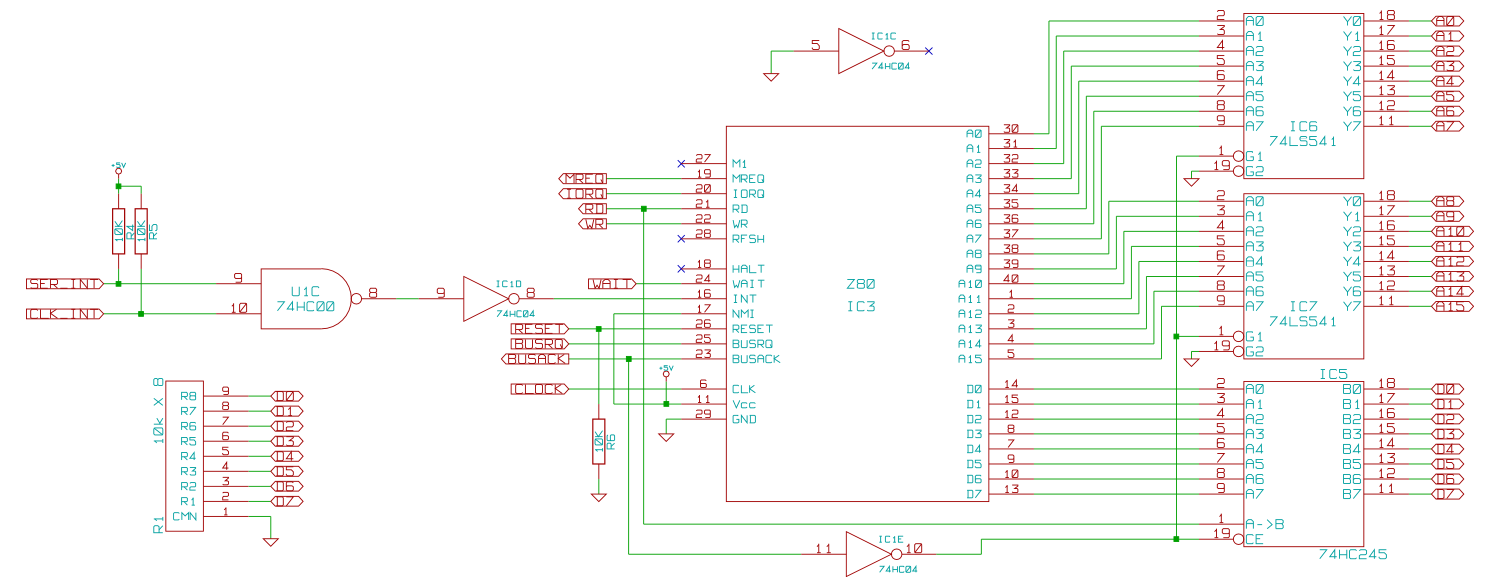
Nathan's Z80 Project Mark 2: CPU
Last updated: 26 Aug 2009 - 23:06
The CPU in this system is a Z80 of course. There isn't much to this section in way of technical content, just a few explanations of what pins I've ignored and why really. I'm not using the RFSH pin as I'm using static RAM, I can't think of a reason to use this in a modern system, and can think of lots of reasons not to, DRAM is just too much like hard work if you ask me. I've not connected anything to halt as I didn't really have room on the board in the end, it is often handy to put an LED on here (although it should be driven with a transistor as this pin can't sink/source much current). I've not used the non-mask-able interrupt so that's tied high to stop it going off by accident, the M1 line is not used in this simple system, so is left un-connected.
There are two interrupt sources in the system, the clock and the UART, so the interrupt signals are combined with a simple AND gate, (remember if you want a trigger on either one OR another active low signal you must AND them, l

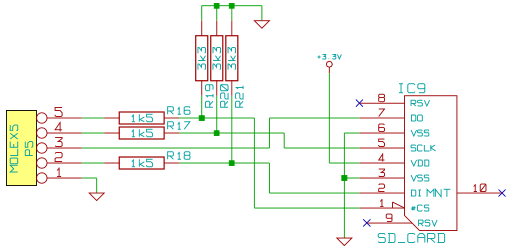
Nathan's Z80 Project Mark 2: CPU Supervisor
Last updated: 24 Aug 2009 - 22:43
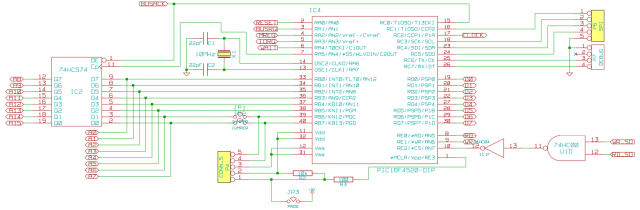
A large amount of the usual faff found in Z80 systems has been avoided in my design by including a PIC next to the Z80. This PIC replaces the reset timing circuit, the clock generation circuit for the Z80 and the need for ROM and associated decode logic to select the ROM chip. In addition it provides mass storage (via an SD card interface) and a useful in-circuit emulator for debugging.
All this is achieved by giving the PIC ultimate control over the Z80 by controlling the reset and clock lines, as well as the DMA control lines. The PIC can then control the system while the Z80 is in reset or DMA mode. Since PICs can turn their pins from input to output, several pins function both as input and output depending on what the PIC is doing (e.g. RD, WR, WAIT etc.) Others have been added specifically for debugging or booting (e.g. MREQ, IORQ, and address pins). To be able to drive the whole 16bit address bus the PIC uses a latch for the high 8bits. The lower 8 are driven directly b
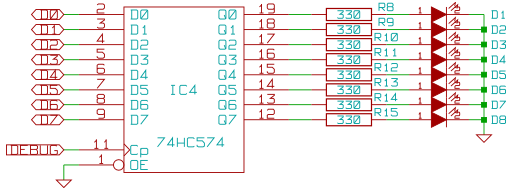
Nathan's Z80 Project Mark 2: Debug Ports
Last updated: 24 Aug 2009 - 20:19
One thing I've learned about Z80 systems is that they are quite hard to debug, at least compared to modern micro-controller based things that you can always get to flash an LED at you or dump data through a serial port. To help with the inevitable debugging that this system is going to require I built in a couple of debug features. One is that I connected more control lines that were absolutely necessary to the PIC. These extra control lines coupled with its design requirement to be able to take over the whole data and address bus mean that it can run as an in-circuit emulator, with access to all the RAM and IO devices in the system. To make this access useful to me, I added a 4 pin port compatible with the Parallax PropPlug, a simple USB to TTL serial adapter. Basically it's like any serial to USB adapter but with only the receive and transmit lines, and without all the annoying RS232 signal level issues. So the plan is to write a basic debug mode for the PIC that accepts comman